Triage and remediate Supply Chain findings
At least one repository that scans for dependencies through Semgrep Supply Chain. See Scan third-party dependencies.
Once Semgrep Supply Chain successfully scans your repository and you've viewed your results, you can assess, triage, and remediate the findings presented in Semgrep AppSec Platform using the Supply Chain page. Semgrep provides the following methods to help you evaluate your findings:
| Assessment action | Method |
|---|---|
| Filter findings. | Click any filter on the Supply Chain page. |
| View specific CVE entries in cve.org. | Click the finding's CVE badge. |
| View specific pattern matches in your codebase. | View the Supply Chain finding's Details page. |
| View the dependency path for a transitive dependency. | View the Supply Chain finding's Details page. |
| View safe versions to upgrade your dependencies. | View the Supply Chain finding's Details page. |
Once you've assessed the findings, the following actions are available to you.
Remediate true positives
Remediate (or resolve) true positives in Semgrep Supply Chain by:
- Updating the dependency to a safe version that does not contain the vulnerability.
- Removing the dependency and refactoring all usages in the codebase.
Review provisionally ignored findings
Provisionally ignored findings are those identified by Semgrep as unreachable. These findings block pull requests and merge requests if the corresponding rule is included in a blocking policy.
You can change the status of provisionally ignored findings to indicate the next steps in the triage process. For instance, you can set the status to Reviewing if you decide to manually review the finding.
Remove the dependency and refactor the code
Removing dependencies and refactoring code are other methods to remediate vulnerabilities. Upon merging any dependency removals, Semgrep Supply Chain scans the pull request or merge request, detects changes to your manifest file or lockfile, and updates the status to Fixed.
Upgrade guidance and click-to-fix pull requests
If the remediation for a finding is to upgrade the package, upgrade guidance uses program analysis and AI to analyze the results of your Semgrep scans to see if you can safely and reliably update a vulnerable package or dependency to a fixed version. From there, you can choose to:
- Have Semgrep open a pull request that updates the version used by your repository and guide the developer on the breaking changes in the PR description
- Create a Jira ticket
- Set the finding's triage status as To fix
Semgrep's dependency upgrade guidance can determine if the package upgrade needed to remediate the finding causes breaking changes. Semgrep can then create a PR to upgrade the package, offering a one-click solution to you.
Supported languages and package managers
- Go projects using the
gomodpackage manager - Python codebases with the following package managers:
pippip-toolspipenvpoetryuv
- GitHub Cloud
- This includes projects added to Semgrep through Semgrep Managed Scans
Prerequisites
To access all upgrade guidance and click-to-fix features, you must have:
- At least one repository that scans for dependencies through Semgrep Supply Chain.
- Semgrep Assistant enabled.
- The private GitHub app for Semgrep installed.
- The app must have Read and write access on the Contents permission.
- Optionally: if you have a private registry, connect it to Semgrep. Currently, Semgrep supports only private Python registries.
Features and permissions required
The following table summarizes the features available to you depending on the prerequisites you meet:
| Semgrep features available | Read and write Content permission granted | Code access granted to Semgrep through installation of the private GitHub app | Semgrep Assistant enabled | Private registry connected to Semgrep |
|---|---|---|---|---|
All click to fix and upgrade guidance features, including:
| ||||
All click to fix and upgrade guidance features, but not for dependencies in a private registry:
| The private registry is not connected to Semgrep | |||
Click to fix, but not for dependencies in a private registry:
| The private registry is not connected to Semgrep | |||
All upgrade guidance features, including:
| ||||
All upgrade guidance features, but not for dependencies in a private registry:
| The private registry is not connected to Semgrep |
How this works
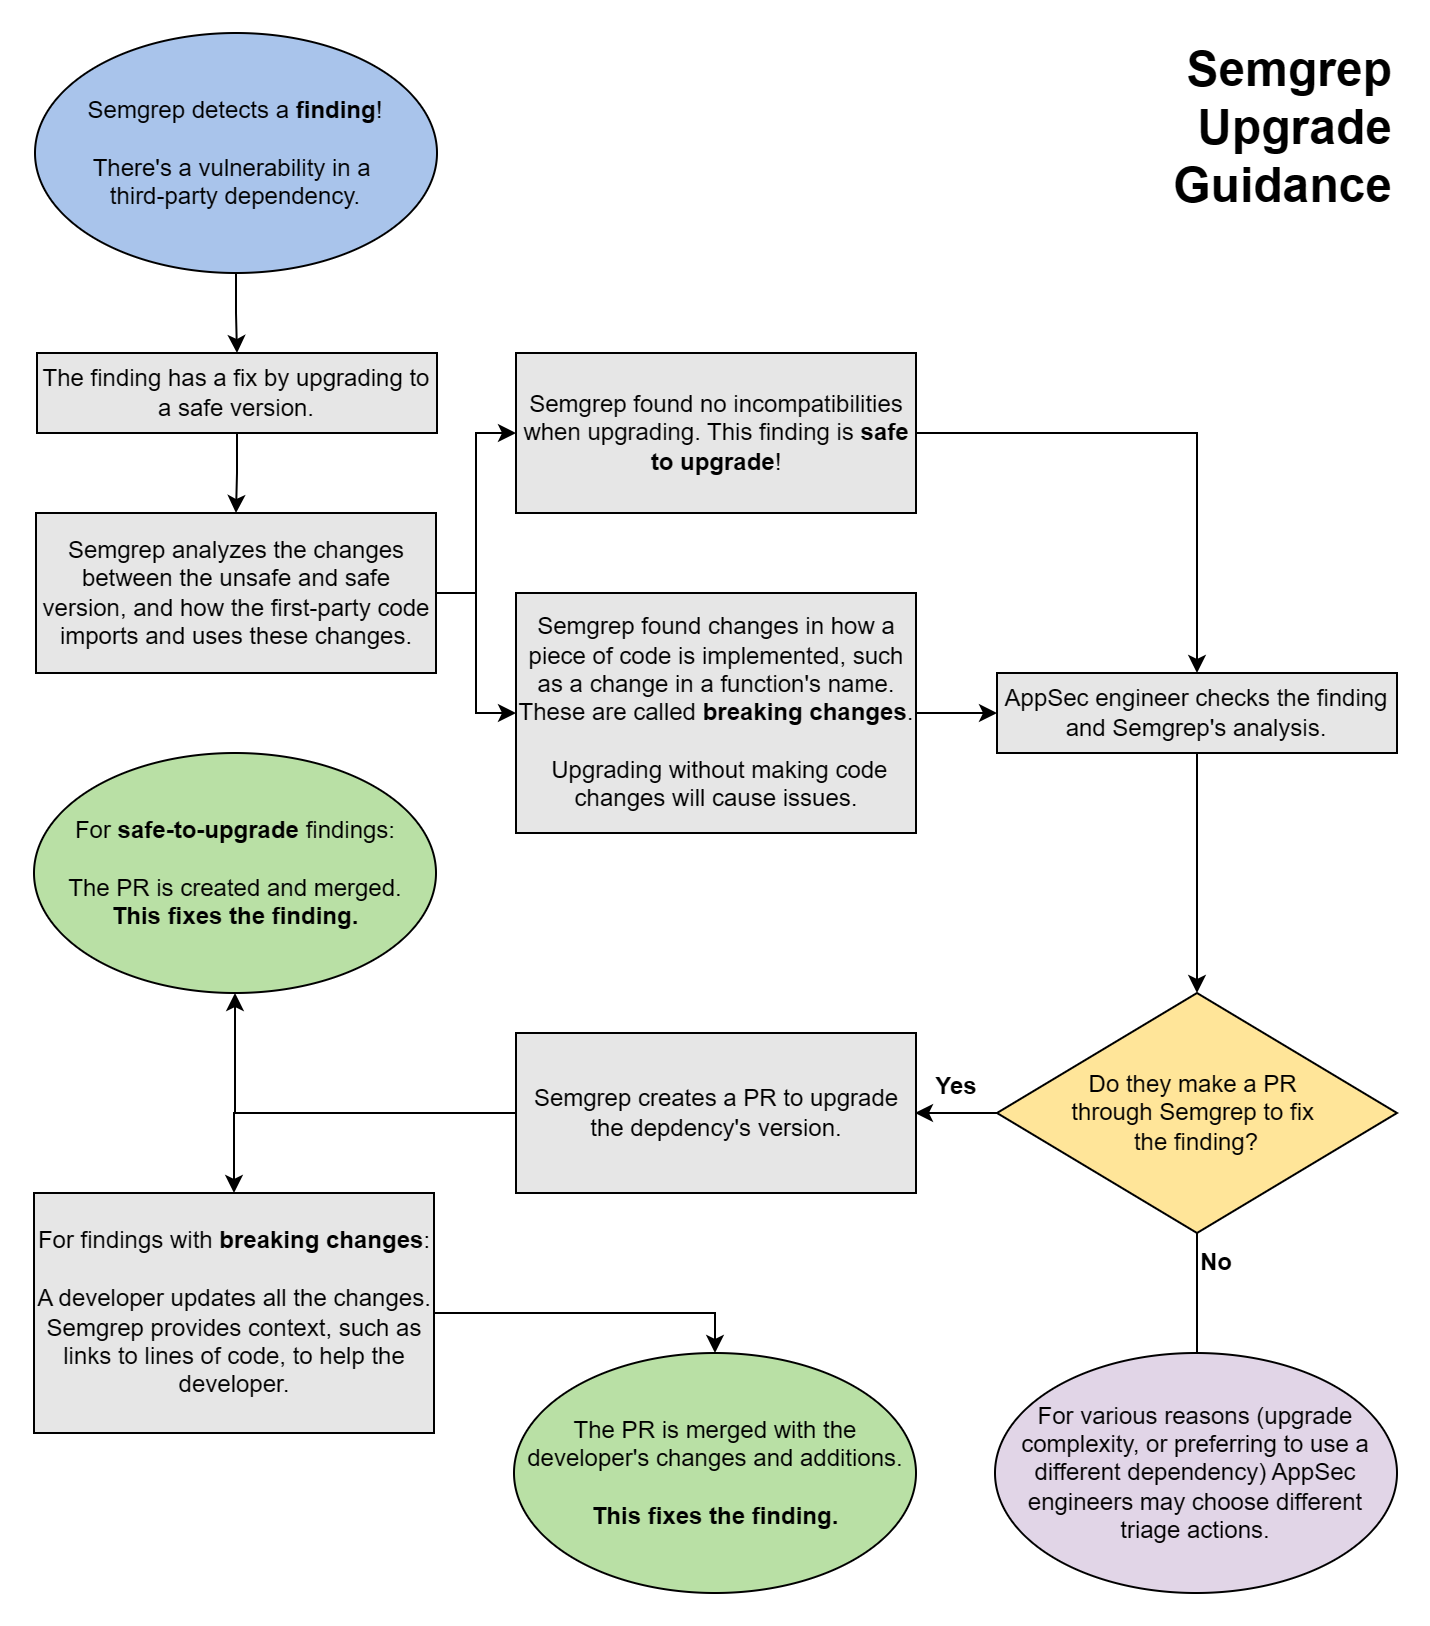
After enabling upgrade guidance, Semgrep performs post-scan analysis and marks applicable findings as Safe to upgrade or with Breaking changes.
- This analysis is performed every two hours on the latest full scan.
- Only findings whose dependencies have fixed versions that resolve the vulnerability are marked by Semgrep as Safe to upgrade or with Breaking changes.
- Findings without any fixed versions have no badge; instead, they say no patch available.
The following chart illustrates the steps Semgrep performs, from scanning to analysis, and the actions you can take based on the advice it provides.
Review a finding's upgrade guidance
To view detailed information about a finding:
- Within Semgrep AppSec Platform, navigate to the Supply Chain page. By default this page loads the Vulnerabilities tab.
- Locate the finding you want to review, then click Details.
The details page is divided into several panels:
- General information:
- The name of the package and a description of the finding
- Its reachability, whether it is direct or transitive, its CVE number, EPSS, and severity
- Its remediation version, if any
- Links to references
- A badge indicating if it can cause breaking changes or not (beta)
- Branch and finding history information
- Branches in which it can be found
- Where it was first detected
- AI analysis performed, if any
- Graphs and code:
- Your code: the source file in which a match was detected; the highlight indicates where the match was found
- Dependency path: displays the path of dependencies; useful when analyzing transitive dependencies
- Pattern and Rule: the pattern and rule logic that determined the match
- A - Upgrade badge
- Indicates if an upgrade is safe or may break your codebase.
- B - The line of code (LOC) of the finding
- This shows the LOC that caused the finding; this does not show the LOC where the breaking changes occur.
- C - Link to change list drawer
- Click this link to display the LOC where a breaking change may occur.
- D - Open fix PR button
- Click this button to open a PR with the code to upgrade the dependency to a safe version, if any.
Create a pull request with fixes
- Navigate to the Details page of the finding for which you want to make a pull request.
- Click Fix > Open fix PR.
A pull request includes:
- The manifest and/or lockfile changes necessary to upgrade the dependency
- The context necessary for developers to fix potentially breaking changes
The following context is included in the pull request description:
- Summary
- Severity and reachability of the finding
- The specific version of the dependency that the PR upgrades to
- Vulnerability details
- A description of the vulnerability and links to its CVE references
- Upgrade guidance
- All the pieces of code, typically files and functions, which make use of the dependency
- Unchanged (safe) pieces of code
- Potentially breaking pieces of code
- Dependency references
- Release notes, changelogs, and commits of the dependency, which may be helpful to resolve the breaking changes
Ignore findings
The Supply Chain tab allows you to identify reachable true positives so you can fix or resolve the related issues. However, you can ignore any false positives, acceptable risks, or deprioritized findings due to some factor. To do this:
- In Semgrep AppSec Platform, go to Supply Chain.
- Select one or more findings.
- Click Triage > Ignored.
- Provide Comments to describe why you're ignoring the selected findings.
- Click Submit.
Block pull request or merge requests
To prevent security vulnerabilities from being merged into your codebase, see Supply Chain Policies for information on how to:
- Block pull requests or merge requests with security vulnerabilities
- Leave comments on pull requests or merge requests with security vulnerabilities
Appendix
Grant Read and write access to a private GitHub Semgrep app
Expand for instructions on granting read and write access to a private GitHub Semgrep app
If you are an existing Semgrep user and you need to change your Semgrep app's permissions:
- Navigate to the settings page of your private Semgrep GitHub app; refer to Changing the permissions of a GitHub app for instructions.
- In the Repository permissions section, search for
Contents. - Click the drop-down menu and select Read and write. :::
Connect a private registry to Semgrep
Expand to learn how to connect a private registry to Semgrep
- Sign in to Semgrep AppSec Platform.
- Navigate to Settings > Integrations.
- Click Add, then select Registry.
- In the dialog that appears, provide the following information:
- The Name of your registry.
- Select the Package manager.
- Select the Authentication method. If none is required, select None (public registry).
- If you select Username and password, provide the required Username and Password.
- If you select API token, provide the required token value.
- Click Connect to save your changes and proceed.
Semgrep currently supports integrations with private Maven package registries for scans without lockfiles.
Troubleshooting: Semgrep is not displaying any upgrade guidance or click-to-fix functionality
Expand for information on troubleshooting if Semgrep is not displaying any upgrade guidance or click to fix functionality
If you can't see any Breaking changes or Safe to upgrade badges or findings, this may be due to the following reasons:
- Your language or package ecosystem isn't supported
- Your source code manager isn't supported
- Your you have not set Read and write access for the Contents permission; see Grant read and write access
- Your findings don't have safe versions to upgrade to yet
- You have no findings within the supported scope of this feature
Not finding what you need in this doc? Ask questions in our Community Slack group, or see Support for other ways to get help.